Comcast had a DNS (Domain Name System) server failure in parts of the country. DNS is the glue that converts human-readable and -typeable names like “www.macworld.com” into the underlying Internet Protocol (IP) numbers used to initiate connections like 70.42.185.230 and 2607:f8b0:400a:805::1004. (The former is old-fashioned, original-flavor IPv4; the latter IPv6.)
It’s a surprisingly important bit of connective tissue. While one can (tediously) enter numbers manually, they’re subject to change, and many web servers are configured so that the name has to be sent as part of the request; this is what allows one piece of hardware or server software to handle multiple or even tens of thousands of different websites.
But you can take this into your own hands very simply. All computers and most mobile devices and routers let you point to DNS servers other than those provided by your ISP (Internet service provider). There are a few potential problems with this, but if the choice is between Internet and no Internet, there’s no reason not to.
Choose an alternate and configure DNS
So-called public DNS providers offer DNS lookups that anyone can use. Switching to one requires a tiny bit of configuration, but no account or other arrangement with the service.
OpenDNS is the oldest of these, and it started at a time when ISP-run DNS servers were pokey as all get-out: it could take a second or even longer the first time your computer requested a given domain name to look up or resolve that name into an IP address. OpenDNS made web browsing seem faster by having zippy servers. The company now has an array of free-with-registration and paid add-on services for malware, threat protection, and network usage analysis. Its DNS servers are at 208.67.222.222 and 208.67.220.220.
Google’s Public DNS followed later, and is just DNS and nothing more. It has the stylish numbers 8.8.8.8 and 8.8.4.4 for its DNS servers. (There are other public providers, but no reason I know of to shop around further.)
In the vast majority of network configurations, an IP address and other network settings are provided from a DHCP (Dynamic Host Configuration Protocol) server on a local network via a router to all devices that need Internet access. One or more DNS servers is set this way. However, you can override this.
While public and ISP DNS providers typically give you two servers, that’s to handle a transient failure or temporary overloading. Each “server” is actually a collection of hundreds or thousands of pieces of hardware that answer on some round robin basis to queries to the main IP address. One server is fine, but two provide more resiliency.
Mac OS X
In all recent versions of OS X, follow these steps:
Open System Preferences and click Network.
Select your active adapter, such as Wi-Fi or ethernet.
Click Advanced.
Click the DNS tab.
Click the + sign at the bottom and paste in the first DNS server. Then click + again to paste in the second.
Click OK and then Apply.
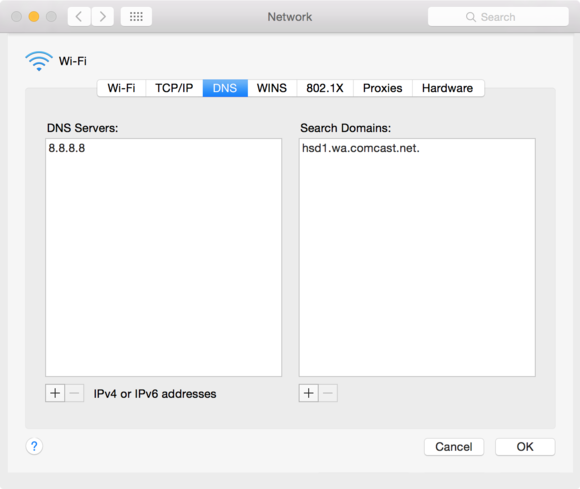
Change DNS settings in OS X through the Network preference pane by clicking Advanced with any adapter selected.
The new settings are immediately available. If you want to be able to switch back and forth between your ISP’s DNS and a public DNS server, follow these steps:
Select your adapter.
From the settings (gear) menu at the bottom of the adapters list, choose Duplicate Service.
Name the duplicate something descriptive, like “Wi-Fi Google DNS.”
Click Duplicate.
Now use the steps above to set the DNS values.
For clarity’s sake, select the original service, then the gear icon, then Rename Service to call it something distinct from Step 3.
Select the service you’re not using and choose settings > Make Service Inactive to disable it. Choose settings > Make Service Active to turn on the other, if it’s not already. Click Apply.
iOS
Unfortunately, Apple doesn’t offer global DNS settings in iOS. Instead, you have to change the DNS server addresses for each network you join. For a single home network, that’s not much of a burden, but it’s more of a problem when you roam, if you want to use alternate DNS.
Launch Settings.
Select Wi-Fi.
Tap the information i icon to the right of your active network.
Tap the DNS field to erase and enter your own server values, separated by a comma.
Tap Wi-Fi and the settings are applied.
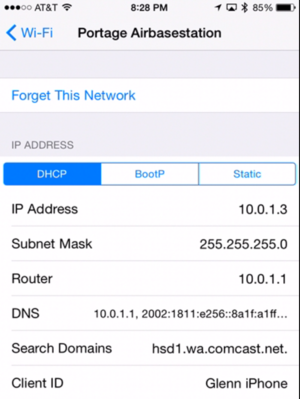
iOS only lets you change the DNS servers for each Wi-Fi network to which you connect.
AirPort Utility
If you’re using one or more Apple Wi-Fi base stations on your network and also use your only base station or your main one to hand out network assignments via DHCP, you can change what DNS values all connected devices use unless they’re overridden with local settings as with the instructions above.
Launch AirPort Utility.
Select your base station or the main base station in a network of more than one.
Click the Edit button. (Enter the base station’s password if prompted.)
Click the Internet tab.
In the DNS Servers fields, enter the server IP addresses. (You can separately set IPv6 DNS servers if needed, but IPv4 DNS servers can provide IPv6 addresses and vice versa.
Click Update, which will temporarily make the network unavailable while the base station restarts with the new settings.

AirPort Utility allows entering DNS server settings that are then used when network addresses are assigned to devices as they connect.
If you’d like to be able to easily swap between a public DNS server and your ISP’s servers, save your set up first by choosing File > Export Configuration File. Name the file descriptively so you can identify it later, like “AirPort Main ISP DNS Servers.”
Now make the changes as in the steps above, and after the base station reboots, select File > Export Configuration File, and save with a similarly descriptive name, such as “AirPort Main Google Public DNS.”
When you want to swap between them, following steps 1 to 3 above, then select File > Import Configuration Server, select the file, then click Update. The base station will restart with the new configuration.
Hold me closer, tiny DNSer
There’s a downside to picking a public DNS service instead of one operated by your ISP. Content distribution networks (CDNs) are heavily used by companies large and small to push images, movies, and other media “closer” to end users. They accomplish this by instead of running massive servers in a few places (or, for a small company, one server somewhere), having many thousands of servers around the globe.
These servers are located either in major network interchanges or inside the networks operated by ISPs and companies. When users request webpages or other downloads, their device, router, or ISP’s DNS request returns a result for the IP address of a server that has the fewest number of network hops. Akamai is a popular CDN, while Amazon runs one as part of its on-demand services division. Apple built its own and also contracts with others.
However, public DNS servers can’t pass along the origin point of a DNS request the way a broadband provider can: the CDN network sees a request from the DNS server, not from your point in the network. This can result in your system getting a connection to a CDN server that’s very “far” from you in network terms. A download that should flow at 10Mbps instead pokes along at 500Kbps.
Keep that in mind if it happens to you; the solution is to switch back (at least temporarily) to an ISP’s DNS servers as described above.
The next time you have heartbreak of Internet failure, DNS may not be the problem. An errant backhoe cutting through cabling or sheer incompetence may be at work. But it’s worth a shot, and for some ISPs, switching to public DNS can often improve overall performance.
0 commenti:
Posta un commento